Setup your own DNS over HTTPS server

DNS over HTTPS (DoH) is a protocol for Domain Name System resolution using HTTPS to secure the communication between the client and the name server. It was proposed by the IEFT and is still a work in progress. However, DoH has been quickly implemented by the Big Tech corporations like Google, CloudFlare and also Mozilla Foundation which enabled the protocol by default in the United States of America in Firefox.
Today, almost all modern browsers are able to use DoH and according to Wikipedia, both Apple’s iOS 14, MacOS 11 and Microsoft Windows 11 support DoH. On Linux, some clients are also available, and we will see in this article how to setup one.
What is DoH and why using it ?
First : what this article won’t tell you
I’m not telling to use DoH, but how to use DoH. This solution remains a technical one and if badly setup, you can do worse than good (and maybe this article is a big bag full of shit, but I hope not). So I’ll tell why I’ve choose to use it.
I’m not telling you to not use ISP or public DNS provider (like OpenDNS). I’m telling why I’ve made this choice.
And finally, decide by yourself what you want to do, I’m not your dad.
Do you know how DNS works ?
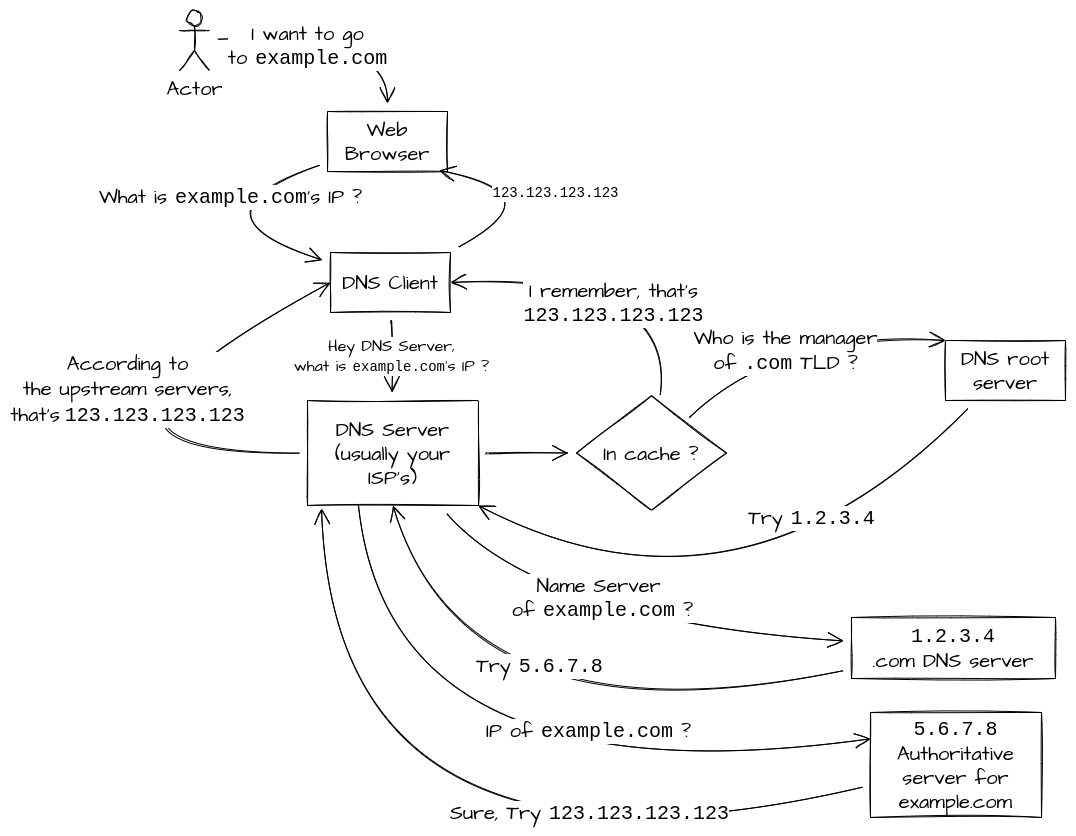
It’s an ensemble of request / answer made by several actors.
- User wants to go to
example.com - The Browser will ask the system resolution service for
example.com’s IP - If the system resolution cache knows the answer, it’ll stop here. If not, it’ll ask to its upstream server, usually the ISP DNS servers.
- Same thing, the ISP DNS server may already have the answer in case. If not, It’ll ask to the DNS root servers.
- The Root server will answer who is the server which has the authority over
.comzone. - The ISP DNS Server will now query the
.comDNS server. The name server is provided in return. - The ISP DNS asks to the name server the IP of
example.comand get it.
DNS is one of the oldest protocol existing on the Internet and also one of the most fundamentals because that’s this one who tells the client what is an IP according to a name. However, DNS is poorly secured and can be easily deceived or altered.
DNS is usually hijacked for censorship
Liar DNS is the usual censorship way for various countries. In France, when a Court pronounce the blocking of a website (because of child pornography, illegal gambling, terrorism, and more recently because of poorly written laws against pornography access[fr]), the Internet Service Providers has the obligation to redirect the condemned website trafic to a Government web page indicating why the site is blocked or simply restrict the access without any other information.
Typically, to answer this blocking request, the ISP will create specific entries in their DNS servers that will ignore the authoritative name server and return their own IP.
For example with https://sci-hub.se. This website has been blocked in France because it was condemned for intellectual property violation. If I ask the IP of this website to my ISP (Orange) DNS, I have this :
$ dig sci-hub.se @81.253.149.10

; <<>> DiG 9.16.24-RH <<>> sci-hub.se @81.253.149.10
;; global options: +cmd
;; Got answer:
;; ->>HEADER<<- opcode: QUERY, status: NOERROR, id: 19391
;; flags: qr rd ra; QUERY: 1, ANSWER: 1, AUTHORITY: 0, ADDITIONAL: 1

;; OPT PSEUDOSECTION:
; EDNS: version: 0, flags:; udp: 1232
; COOKIE: 49089c04bb7247a783fd7bd861e2f1aaf64872d90f73fb5b (good)
;; QUESTION SECTION:
;sci-hub.se.			IN	A

;; ANSWER SECTION:
sci-hub.se.		5	IN	A	127.0.0.1

;; Query time: 6 msec
;; SERVER: 81.253.149.10#53(81.253.149.10)
;; WHEN: Sat Jan 15 17:09:17 CET 2022
;; MSG SIZE  rcvd: 83
Instead of this :
$ dig sci-hub.se


; <<>> DiG 9.16.24-RH <<>> sci-hub.se
;; global options: +cmd
;; Got answer:
;; ->>HEADER<<- opcode: QUERY, status: NOERROR, id: 56632
;; flags: qr rd ra; QUERY: 1, ANSWER: 1, AUTHORITY: 0, ADDITIONAL: 1

;; OPT PSEUDOSECTION:
; EDNS: version: 0, flags:; udp: 1232
;; QUESTION SECTION:
;sci-hub.se.			IN	A

;; ANSWER SECTION:
sci-hub.se.		1124	IN	A	186.2.163.219

;; Query time: 0 msec
;; SERVER: 127.0.0.1#53(127.0.0.1)
;; WHEN: Sat Jan 15 17:10:28 CET 2022
;; MSG SIZE  rcvd: 55
Fun fact : The Court decision regarding sci-hub.se was asking to Orange, SFR, Bouygues Telecom and Free to execute. But forgot OVH Telecom[fr] and various other smaller or associative ISP like French Data Network (FDN)[fr]…
DNS is also hijacked for ads and or content filtering
Another common issue with public or ISP liars servers is replacing a non-existent entry by a false web page containing ads or worse. That’s also a treachery that require liars DNS servers.
In 2009, that was SFR, a French ISP, who has been spotted to modify its DNS answers[fr]. Instead of answering NXDOMAIN (non existent domain), the users had a NOERROR and redirected them to a search page. Of course it was “to enhance the user experience”… The story don’t said if there was some advertising or tracking content in these pages. According to Rani Assaf on the mailing list[fr] (the former chief technical director of Free), ISP are regularly approach by various ad-sellers.
OpenDNS was also a liar DNS for years until 2014 when they stopped their ad-supported service. Another liar DNS is for example the “Family Shield” service provided by OpenDNS that block adult content. Unless the previous example, this service is intended to provided like this and the user is aware of it. But that’s based on the same mechanics :
$ dig pornhub.com @208.67.222.123

;; ANSWER SECTION:
pornhub.com.		0	IN	A	146.112.61.106

$ whois 146.112.61.106 | grep -i netname
netname:        OpenDNS-RIPE

$ dig pornhub.com

;; ANSWER SECTION:
pornhub.com.		3081	IN	A	66.254.114.41

$ whois 66.254.114.41 | grep -i netname
NetName:        REFLECTED-1
How DoH works
DNS-over-HTTPS workflow, in a simplified way, can be represented like this :
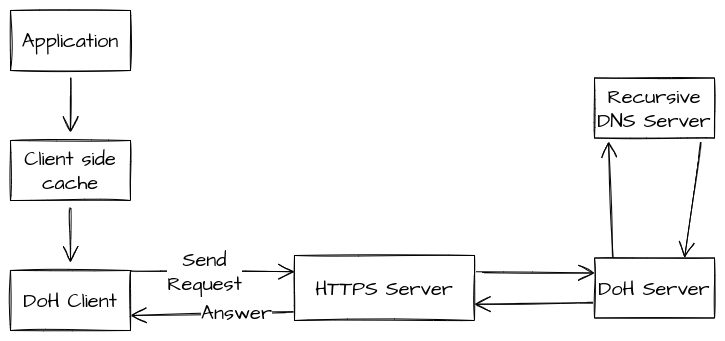
- The DoH client will ask its upstream server for the domain IP.
- The upstream server is an HTTPS server (that could also be behind a CDN) that transfer the request to the DoH server
- The DoH server ask its upstream DNS resolution (which is the same way as explained above) and provide the answer
However, DoH is not magic : the upstream DNS request is still in the same fashion, so there is no specific privacy enhancement on this side. That’s why you need to trust the upstream server or install your own one (with BIND for example) that’ll query the DNS root servers.
What can DoH provide :
- It makes more secure the name resolution requests between the client and the server because they are enclosed inside an encrypted protocol (HTTPS)
- It makes more difficult to apply a censorship policy on naming resolution.
- It reduce the trafic analysis capabilities.
What DoH won’t do :
- Ensure the upstream server is a nice guy
- Centralize more the Internet : you’re free to setup your own one or use a public one that are not CloudFlare’s, Google’s and so on, just like the Fediverse
Some criticism addressed to DoH are mostly because of Mozilla’s choice to implement it by design in Firefox and use Cloudflare instance. However, these criticism are not really because of DoH itself but the choices of one company (as explained by Stéphane Bortzmeyer in this article[fr]). Some good points :
- Using HTTPS is dirty : indeed, but today almost everything goes through HTTP and that’s the only ports that are not blocked by proxies or Wi-Fi access points.
- The DNS resolution is made by the application and not the system : yes, but you can install DoH client on your system and make Firefox use it. That’s not because of DoH design, that’s just Mozilla’s choice and they can also make UDP request for naming resolution.
Why am I using DoH ?
Because I’m sensitive to privacy and I hate censorship of any kind. I like to have control of what I’m doing and not being blocked by some arbitrary decision.
If I can understand the reason why blocking some content (but for sci-hub case, absolutely nothing should prevent knowledge access IMHO), but I don’t think that’s the good way. Blocking content does not make them disappear, just being more difficult to find.
There is also previous cases of over blocking[fr] because of these policies.
Now, you are aware of the idea (I hope), so let’s go to the practice.
Setup the server
The server we will install is based on m13253’s DNS over HTTPS server. It’s written in Go and available in various ways. For a more easy way, I’ll use the container image made by satishweb.
Start the DoH server
As you may know, I like using Podman but these commands are fully Docker compatible.
There are required parameters for the container image :
UPSTREAM_DNS_SERVER(mandatory) : DoH require an upstream resolver to use for the request. By default, satishweb’s image use OpenDNS. In my case, I use the OVH DNS for the moment.DOH_HTTP_PREFIX: The DoH URL prefix, the default is/getnsrecord/but DoH generally use/dns-query. I didn’t changed it, the reverse proxy will translate.DOH_SERVER_LISTEN: In case you want to change the port, the default is:8053.
podman run -itd --name doh-server -p 8053:8053 -e UPSTREAM_DNS_SERVER=udp:<YOURUPSTREAMSERVER>:53 satishweb/doh-server
And we have our server running.
$ curl -w '\n' 'http://localhost:8053/getnsrecord?name=fosstodon.org&type=A'
{"Status":0,"TC":false,"RD":true,"RA":true,"AD":false,"CD":false,"Question":[{"name":"fosstodon.org.","type":1}],"Answer":[{"name":"fosstodon.org.","type":1,"TTL":306,"Expires":"Sat, 15 Jan 2022 17:20:53 UTC","data":"217.182.80.236"}]}
Create the reverse proxy configuration
Of course, you will need a certificate in order to enable HTTPS on your reverse proxy, so you can use Let’s Encrypt and Certbot.
The reverse proxy configuration is very simple, in this case Apache :
<VirtualHost *:80>
	ServerName <yourFQDN>:80
	Redirect permanent / https://<yourFQDN>
	RewriteEngine on
	RewriteCond %{SERVER_NAME} =<yourFQDN>
	RewriteRule ^ https://%{SERVER_NAME}%{REQUEST_URI} [END,NE,R=permanent]
	CustomLog /var/log/httpd/doh_access.log common
	ErrorLog /var/log/httpd/doh_error.log
</VirtualHost>

<VirtualHost *:443>
	ServerName <yourFQDN>:443
	ServerAlias <yourFQDN>
	CustomLog /var/log/httpd/doh_access_ssl.log common
	ErrorLog /var/log/httpd/doh_error_ssl.log

	ServerAdmin <yourServerAdminEmail>
	Include /etc/letsencrypt/options-ssl-apache.conf

    RequestHeader set X-Forwarded-Proto "https"
	RequestHeader set X-Forwarded-Port "443"
	ProxyPreserveHost On

	ProxyPass /dns-query http://localhost:8053/getnsrecord
	ProxyPassReverse /dns-query http://localhost:8053/getnsrecord


    SSLCertificateFile /etc/letsencrypt/live/<yourFQDN>/fullchain.pem
    SSLCertificateKeyFile /etc/letsencrypt/live/<yourFQDN>/privkey.pem
</VirtualHost>
Then, try to connect :
$ curl -w '\n' 'https://<yourFQDN>/dns-query?name=fosstodon.org&type=A' | jq .
  % Total    % Received % Xferd  Average Speed   Time    Time     Time  Current
                                 Dload  Upload   Total   Spent    Left  Speed
100   274  100   274    0     0   7025      0 --:--:-- --:--:-- --:--:--  7025
{
  "Status": 0,
  "TC": false,
  "RD": true,
  "RA": true,
  "AD": false,
  "CD": false,
  "Question": [
    {
      "name": "fosstodon.org.",
      "type": 1
    }
  ],
  "Answer": [
    {
      "name": "fosstodon.org.",
      "type": 1,
      "TTL": 1557,
      "Expires": "Sat, 15 Jan 2022 13:44:39 UTC",
      "data": "217.182.80.236"
    }
  ],
  "edns_client_subnet": "<client subnet>"
}
Okay, our DoH Server should be able to process requests.
Enable DoH in the browser
On Vivaldi (and certainly all Chromium-based)
Open a new tab and go to chrome://settings/security.
You may find this setting :
Use secure DNS
Determines how to connect to websites over a secure connection
Activate it and choose “custom”. Then, paste your DoH server URL like this : https://<yourFQDN>/dns-query.
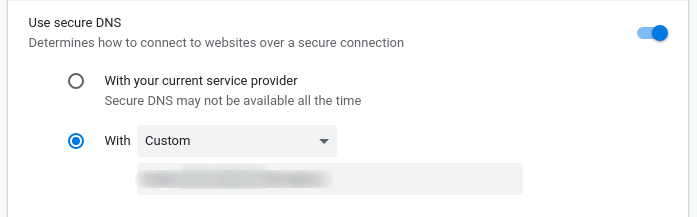
It’ll complain if the server is unable to answer properly.
This setting should work on each Chromium-based browser, but I haven’t tested myself. Let me know if one of them has a specific setting.
For Fedora users
In case the browser says “cannot change this setting on a managed browser”, that’s because of a policy installed by the distro. I had to uninstall the package fedora-chromium-config to be able to remove the “managed browser” status.
This package install an add-on that add “Fedora” in the user-agent and a policy that I don’t really understood its purpose… So go away.
I don’t know if any other Linux distro do the same thing, Manjaro seems not.
On Firefox

In the sub window configuration add your server at the bottom of the settings window.
How to check ?
Just go on your reverse proxy access log : you should see requests passing by.
<client IP> - - [15/Jan/2022:12:46:35 +0000] "POST /dns-query HTTP/1.1" 200 122
<client IP> - - [15/Jan/2022:12:46:35 +0000] "POST /dns-query HTTP/1.1" 200 110
<client IP> - - [15/Jan/2022:12:47:50 +0000] "POST /dns-query HTTP/1.1" 200 129
<client IP> - - [15/Jan/2022:12:47:50 +0000] "POST /dns-query HTTP/1.1" 200 153
You can also trigger a request like this :
curl -w '\n' 'https://<yourFQDN>/dns-query?name=fosstodon.org&type=A' | jq .
  % Total    % Received % Xferd  Average Speed   Time    Time     Time  Current
                                 Dload  Upload   Total   Spent    Left  Speed
100   274  100   274    0     0   7025      0 --:--:-- --:--:-- --:--:--  7025
{
  "Status": 0,
  "TC": false,
  "RD": true,
  "RA": true,
  "AD": false,
  "CD": false,
  "Question": [
    {
      "name": "fosstodon.org.",
      "type": 1
    }
  ],
  "Answer": [
    {
      "name": "fosstodon.org.",
      "type": 1,
      "TTL": 1557,
      "Expires": "Sat, 15 Jan 2022 13:44:39 UTC",
      "data": "217.182.80.236"
    }
  ],
  "edns_client_subnet": "<client subnet>"
}
Use DNSCrypt-proxy in Linux as a system resolver
Nowadays, most Linux distros come with Systemd and its own DNS resolver service. To be sure we use the DoH server instead of resolved, we will replace it with DNSCrypt proxy.
This procedure is provided as an example on Fedora, please be aware that it could vary depending of your distro.
Install DNSCrypt-proxy
DNSCrypt Proxy should be available in your system repositories. In Fedora’s case :
$ sudo dnf install dnscrypt-proxy
Do not start the service yet, there is some configuration to do.
Disable resolved
Use the following command, you’ll see systemd-resolve listening on port 53.
$ sudo ss -lp 'sport = :domain'
Netid            State             Recv-Q            Send-Q                         Local Address:Port                           Peer Address:Port            Process
udp              UNCONN            0                 0                              127.0.0.53%lo:domain                              0.0.0.0:*                users:(("systemd-resolve",pid=1107,fd=16))
tcp              LISTEN            0                 4096                           127.0.0.53%lo:domain                              0.0.0.0:*                users:(("systemd-resolve",pid=1107,fd=17))
Disable systemd-resolved
$ sudo systemctl stop systemd-resolved
$ sudo systemctl disable systemd-resolved
Check again, nobody should listen on port 53 anymore.
$ sudo ss -lp 'sport = :domain'
Netid                 State                 Recv-Q                 Send-Q                                 Local Address:Port                                 Peer Address:Port                Process
Configure DNSCrypt-proxy
Go to /etc/dnscrypt you’ll find various configuration files.
$ ll
total 56
-rw-r--r--. 1 root root   165 Sep 27 11:59 allowed-ips.txt
-rw-r--r--. 1 root root   985 Sep 27 11:59 allowed-names.txt
-rw-r--r--. 1 root root   471 Sep 27 11:59 blocked-ips.txt
-rw-r--r--. 1 root root  1039 Sep 27 11:59 blocked-names.txt
-rw-r--r--. 1 root root  1523 Sep 27 11:59 captive-portals.txt
-rw-r--r--. 1 root root  1277 Sep 27 11:59 cloaking-rules.txt
-rw-r--r--. 1 root root 28561 Oct 23 16:29 dnscrypt-proxy.toml
-rw-r--r--. 1 root root  1013 Sep 27 11:59 forwarding-rules.txt
Backup dnscrypt-proxy.toml and open it.
Line 34, you may find server_names instruction, add the following line :
server_names = ['<yourFQDN>']
Then, at the end of the file, you should find [static] entry. You’ll have to add your server here but first, let’s create a DNS Stamp. The DNS Stamp is a encoded string that will contains all required parameters for name resolution. It contains the IP of the server, the hostname, and the URI path, encoded in base64.
Go to https://dnscrypt.info/stamps/
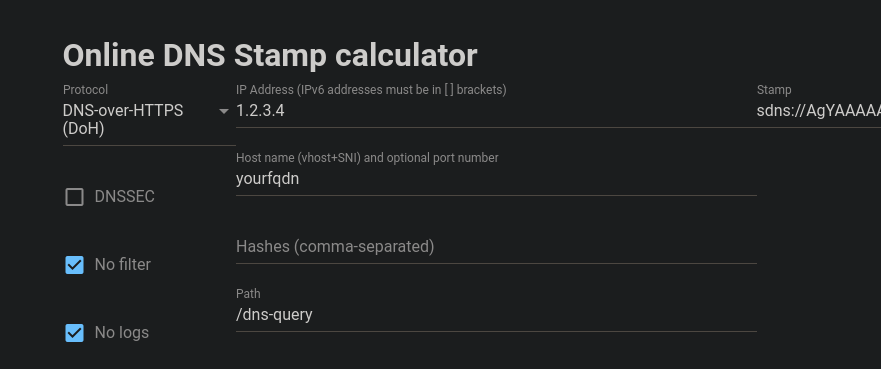
- Protocol : DNS-over-HTTPS
- IP Address : insert your server IP
- Hostname : you FQDN
- Hashes : None
- Path : Keep
/dns-queryunless you customized it - Uncheck DNSSEC box unless you have setup this protocol
In my screenshot I’ve obtained the following string : sdns://AgYAAAAAAAAABzEuMi4zLjQACHlvdXJmcWRuCi9kbnMtcXVlcnk
If you decode it, you’ll find out your settings.
echo 'AgYAAAAAAAAABzEuMi4zLjQACHlvdXJmcWRuCi9kbnMtcXVlcnk' | base64 -d
1.2.3.yourfqdn
/dns-querybase64: invalid input
Go back to dnscrypt-config.toml and put the [static] setting like this :
[static]
    [static.'<yourFQDN>']
    stamp = 'sdns://AgYAAAAAAAAABzEuMi4zLjQACHlvdXJmcWRuCi9kbnMtcXVlcnk'
Save and exit.
From now, DNSCrypt Proxy should be able to work, let’s try ! First, start the service.
$ sudo systemctl start dnscrypt-proxy
$ sudo systemctl enable dnscrypt-proxy
Is it alive ?
$ sudo ss -lp 'sport = :domain'
Netid            State              Recv-Q             Send-Q                         Local Address:Port                           Peer Address:Port            Process
udp              UNCONN             0                  0                                  127.0.0.1:domain                              0.0.0.0:*                users:(("dnscrypt-proxy",pid=3347,fd=7))
tcp              LISTEN             0                  4096                               127.0.0.1:domain                              0.0.0.0:*                users:(("dnscrypt-proxy",pid=3347,fd=8))
Yup, keep going ! Execute the following command : dnscrypt-proxy --resolve fosstodon.org and check the output :
$ dnscrypt-proxy --resolve fosstodon.org
Resolving [fosstodon.org] using 127.0.0.1 port 53

Resolver      : <Resolver IP Adress and Name>
Lying         : no
DNSSEC        : yes, the resolver supports DNSSEC

Canonical name: fosstodon.org.

IPv4 addresses: 217.182.80.236
IPv6 addresses: 2001:41d0:302:1100::1:7615

Name servers  : dns2.registrar-servers.com., dns1.registrar-servers.com.
DNSSEC signed : no
Mail servers  : 3 mail servers found

HTTPS alias   : -
HTTPS info    : -

Host info     : -
TXT records   : zoho-verification=zb15506747.zmverify.zoho.eu, keybase-site-verification=tMLgeyMwgcDsIgA_71u6_wAfqyMS1YEYTwE-J91u8j8, v=DMARC1; p=none, v=spf1 include:zoho.eu ~all
If you check in your reverse proxy access log, you may find the query with a ?hash=xxxx in the request : that’s DNSCrypt Proxy’s doing.
In the Resolver : <Resolver IP Adress and Name> you will see the upstream DNS resolver. In my case, OVH’s one because I’ve set it as the upstream resolver. If you want to see the difference : open again dnscrypt-proxy.toml and comment your server_names entry.
Uncomment the default one : server_names = ['scaleway-fr', 'google', 'yandex', 'cloudflare']
Restart DNSCrypt Proxy and replay the command, you’ll see the resolver changed.
$ dnscrypt-proxy --resolve fosstodon.org
Resolving [fosstodon.org] using 127.0.0.1 port 53

Resolver      : 74.125.47.8
Who is this resolver ?
$ whois 74.125.47.8 | grep -i netname
NetName:        GOOGLE
Get rid of systemd-resolved
Unfortunately, disabled systemd-resolved service is not enough because your resolv.conf remains the same. And I’ve observed that systemd-resolved sometime restarted itself…
Ensure systemd-resolved is disabled :
$ sudo systemctl disable systemd-resolved
$ sudo systemctl stop systemd-resolved
Edit /etc/NetworkManager/NetworkManager.conf
In the [main] section add dns=default :
[main]
#plugins=keyfile,ifcfg-rh
dns=default
Backup your /etc/resolv.conf (which is a symlink)
$ sudo cp -p /etc/resolv.conf /etc/resolv.conf.bak
Remove the symlink and restore the file.
$ sudo rm /etc/resolv.conf
$ sudo cp -p /etc/resolv.conf.bak /etc/resolv.conf
Restart NetworkManager
$ systemctl restart NetworkManager
Check the content of /etc/resolv.conf, it must be reverted by the DNS provided by your DHCP or that you may have setup yourself. In my case, the output is not the expected (because it’s a VM and I have PiHole as a DHCP server) :
cat /etc/resolv.conf
# Generated by NetworkManager
nameserver 192.168.122.1
I haven’t set yet my PiHole server to use DoH, so I’ll change my network connection and manually specify my DNS (which would be localhost). Two possibles ways :
From GUI (GNOME here) :

Do the same in IPv6 if you have, just set ::1 inside the DNS field. Apply and restart Network Manager again, your resolv.conf should go to 127.0.0.1 and ::1.
$ cat /etc/resolv.conf
# Generated by NetworkManager
nameserver 127.0.0.1
nameserver ::1
You can skip to the next heading after this.
From configuration file :
Open the settings file corresponding to your network interface in /etc/NetworkManager/system-connections. You may have something like this :
[ipv4]
dns-search=
method=auto

[ipv6]
addr-gen-mode=stable-privacy
dns-search=
method=auto
Adapt with that :
[ipv4]
dns=127.0.0.1;
dns-search=
ignore-auto-dns=true
method=auto

[ipv6]
addr-gen-mode=stable-privacy
dns=::1;
dns-search=
ignore-auto-dns=true
method=auto
Save, exit and restart Network Manager again, your resolv.conf should go to 127.0.0.1 and ::1.
$ cat /etc/resolv.conf
# Generated by NetworkManager
nameserver 127.0.0.1
nameserver ::1
Test configuration
So far, we have :
- DNSCrypt Proxy installed ✅
- Disabled
systemd-resolved✅ - Ensured DNSCrypt Proxy is the system resolver ✅
Open your reverse proxy access log file in tail mode and give a try with a ping command, or dig or curl :
$ dig fosstodon.org

; <<>> DiG 9.16.11-RedHat-9.16.11-5.fc34 <<>> fosstodon.org
;; global options: +cmd
;; Got answer:
;; ->>HEADER<<- opcode: QUERY, status: NOERROR, id: 55582
;; flags: qr rd ra; QUERY: 1, ANSWER: 1, AUTHORITY: 0, ADDITIONAL: 1

;; OPT PSEUDOSECTION:
; EDNS: version: 0, flags:; udp: 1232
;; QUESTION SECTION:
;fosstodon.org.			IN	A

;; ANSWER SECTION:
fosstodon.org.		2215	IN	A	217.182.80.236

;; Query time: 0 msec
;; SERVER: 127.0.0.1#53(127.0.0.1)
;; WHEN: Sat Jan 15 09:35:30 EST 2022
;; MSG SIZE  rcvd: 58
The server ;; SERVER: 127.0.0.1#53(127.0.0.1) is our localhost, and you may have found the query in your access logs : congratulations, you’re not depending on your ISP DNS or a Big Tech company anymore for naming resolution.