Use KeepassXC to store your passwords and SSH keys
KeepassXC is a free and open-source password manager (GPLv2), forked from KeePassX, itself a cross-platform fork from KeePass which was developed for Microsoft Windows. KeepassXC is available on Linux, BSD, Windows, and macOS. There also are unofficial ports for Android and iOS on mobile.
Keepass is a quite popular password manager based on an offline encrypted database that could be synchronized using a Cloud storage on various devices. The database content needs a decryption key to unlock it, and it also supports key files to level-up the security. KeepassXC also supports the Yubikeys for more security using a challenge-response to open the database.
But, if KeepassXC is nice for Web-usage with its Browser integration, it can also supports SSH keys storage and usage through the SSH Agent. Let me explain how you can achieve that on Linux. This guide will start from the beginning explaining how to use KeepassXC. If you’re already familiar with it, jump to Enable the SSH-Agent integration in KeepassXC.
Install KeepassXC and create your database
KeepassXC is usually available in the repositories of the major Linux distributions. You can obtain it from the download page.
# Ubuntu/Debian based

sudo apt install keepassxc

# Fedora / RHEL / CentOS Stream
# (EPEL Repository required for CentOS and RHEL)

sudo dnf install keepassxc

# Arch Linux / Manjaro

sudo pacman -S keepassxc
Once started, you’ll end-up to the startup windows, asking to open an existing file or create a new database. Let’s create a database, so you’ll learn how to use KeepassXC.
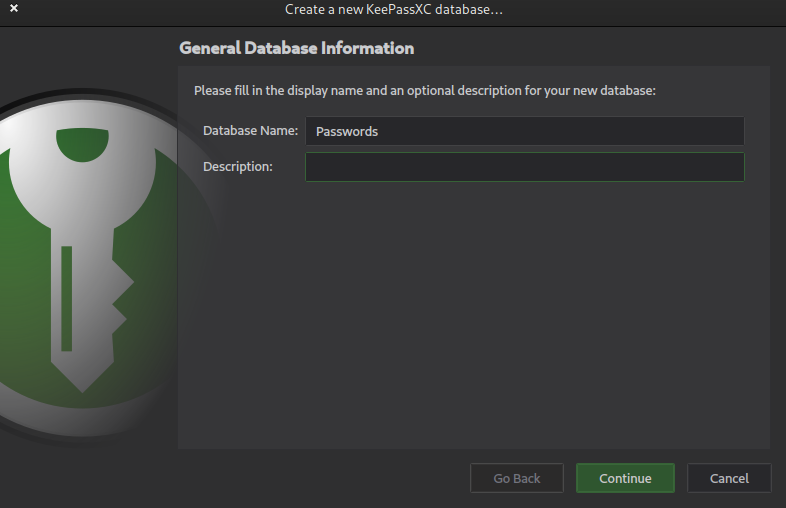
Name your database as you want it. On the next screen, keep the encryption settings to their default values.
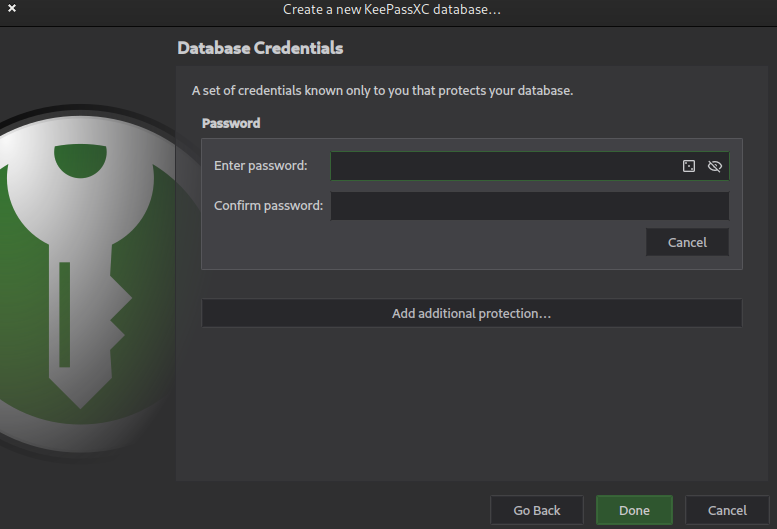
On this screen, you’ll define the master password, or encryption key. Obviously, you must use a password that is not too easy to guess or in a dictionary, but you’ll still be able to remember. Because if you loose it, you’ll loose your database content. That’s the keys to your home !
Save the file generated : that’s the database in which you’ll store your secrets.
Enable the browser integration
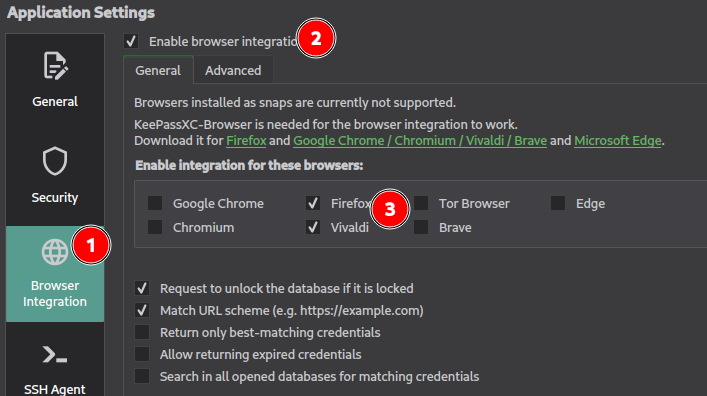
Open KeepassXC’s settings from “Tools => Settings” or using the gear wheel icon.
In the options, go to “Browser integration” and click on “Enable browser integration”. Then, select the browsers you want to integrate and install their respective extension.
Once you’ve installed the extension on your browser, you’ll see the KeepassXC icon on it. Click on it and select “Connect”. KeepassXC will ask you to name this browser relationship. Be careful, don’t use the same name for your various devices because it will be overwritten !
Please refer to the official documentation for more details.
Register your first password
The Keepass Database supports groups to sort your passwords. As you may have seen, it comes with a default layout you’re free to adapt. Don’t worry if you delete and entry, they’re in the database’s “Recycle bin” until you delete it.
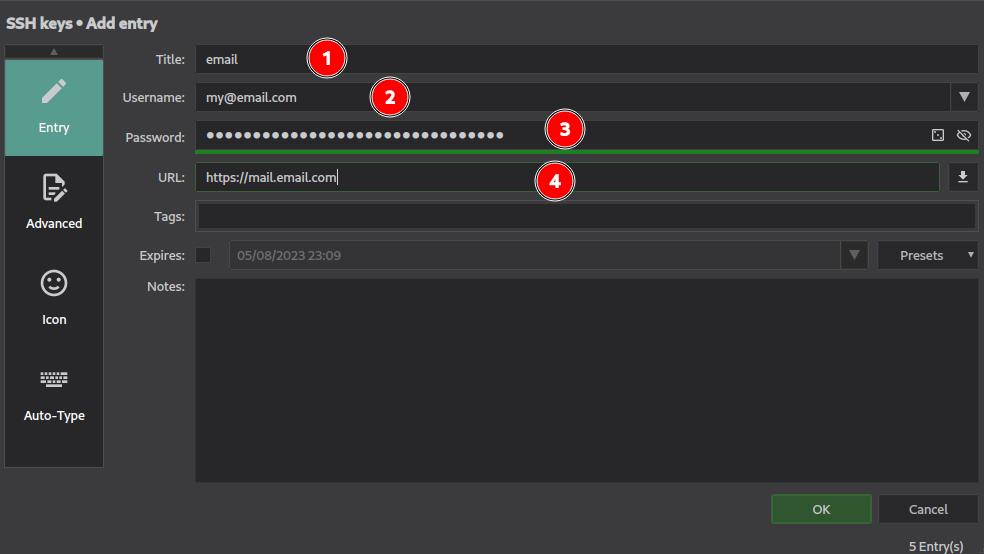
In this example we create an entry for our login and password for our mailbox. Filling the URL field is important for the browser integration because it’ll help the extension to match to an entry in the database. After you’ve registered this entry, if you go to the related URL, KeepassXC will ask for the permission to use the password if a login form is detected.
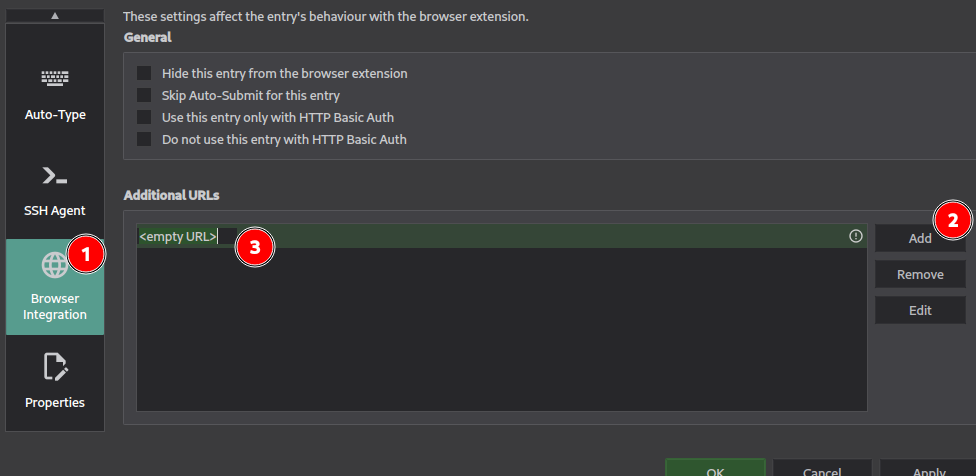
In the case the online service would have different URLs, you can add the supplementary addresses in the entries parameters. Edit the entry and go to “Browser integration” on the left. Then, add the supplementary entry. Once updated, if you refresh the web page, KeepassXC will asks for the authorization on both URLs.
A cool feature on KeepassXC is the password generator. A good practice is to have a unique password for each account you may have.
How would I remember all of them ?!
You don’t ! That’s precisely Keepass’ purpose : store your passwords so you dont have to remember them. The only one you need is you secret key to unlock the database.
The password generator is accessible using the pointed icon on the screenshot below.
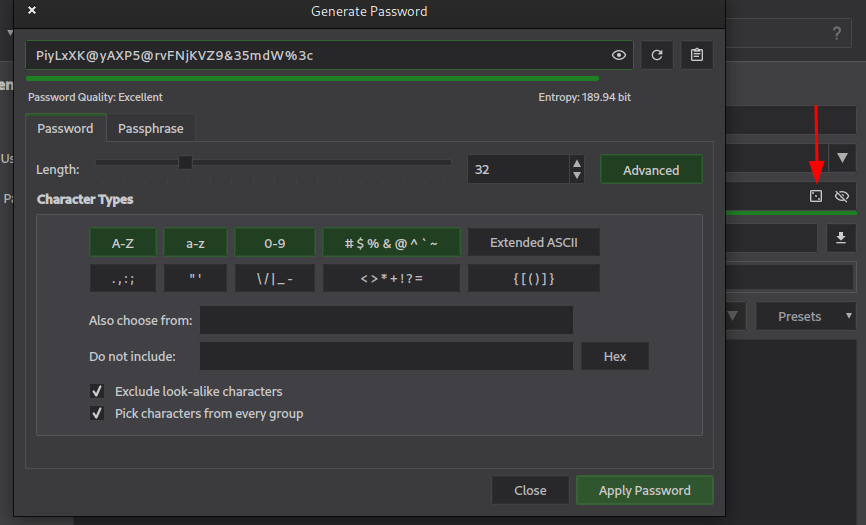
As you can see, it’s pretty configurable and you can adapt its settings to the eventual limitations the service you need to create an account impose. Another cool feature : the password criteria are remembered for each entries. If the service limits the password lengths to 20 characters for example, KeepassXC will generate new passwords using this rule if you change it.
Use KeepassXC for one-time usage passwords (TOTP)
Another nice feature of KeepassXC is the support of the TOTP - time-based one-time password.
Several services propose the two-factor authentication (2FA) : they ask for your login and password, then, for a code generated by another device. KeepassXC can generate these codes and fill them automatically when prompted.
Select the entry you need to enable TOTP and go to “Entries => Add TOTP”.
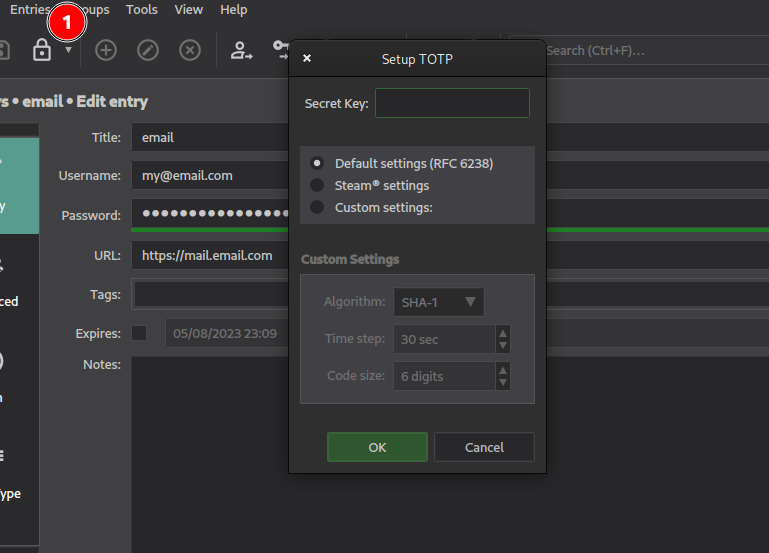
Insert the secret key the service provided to you and register it, KeepassXC will now generate the one-time codes.
Please keep in mind that the purpose of 2FA is to separate the source of the password and the one-time usage code. Myself, I use the TOTP included in KeepassXC only for services I estimate that are security non-critical to me. For more critical services, use an external TOTP generator such as a smartphone application. One way to achieve that with KeepassXC is to store the TOTP in another database, but that's less handy.
The quickstart about KeepassXC is done, now let’s continue to the SSH part.
Enable the SSH-Agent integration in KeepassXC
Just like the Browser integration, KeepassXC supports SSH-Agent integration.
In the application’s options, go to “SSH Agent” and enable it.
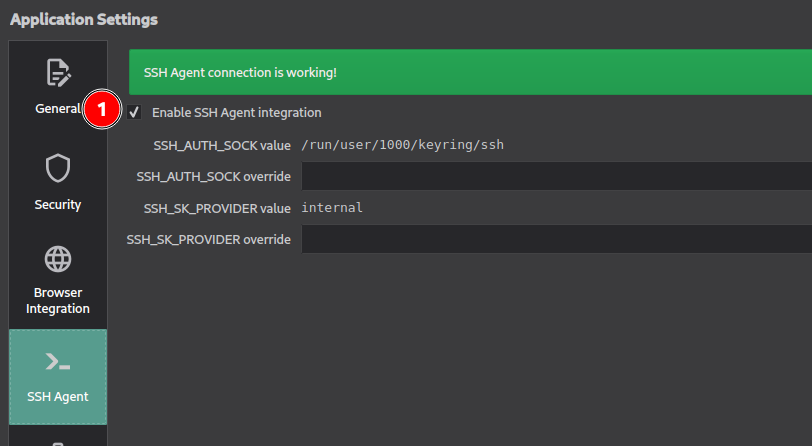
You’ll need to restart KeepassXC after enabling it.
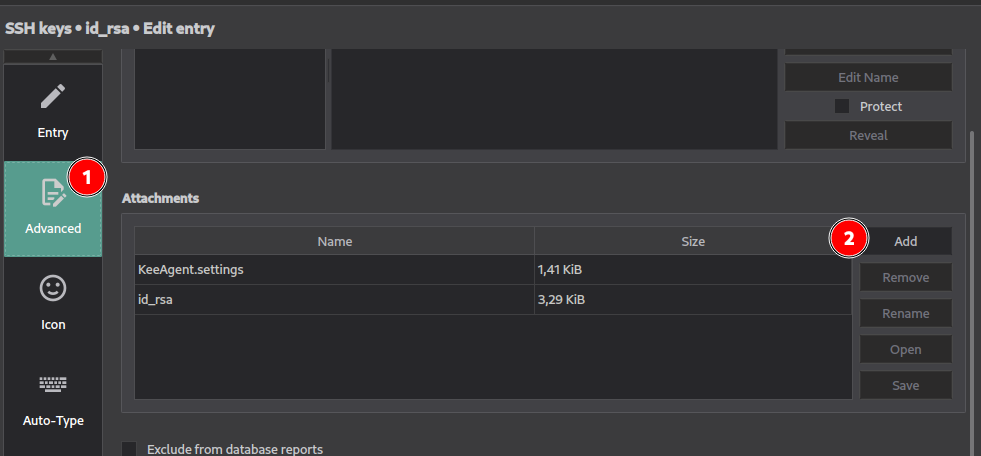
Now, create a new entry for your SSH key. If your key has a passphrase, you can store it in the Password field. In order to add your SSH private key in KeepassXC, you need to go to “Attachments” and add it.
Then, go to the “SSH Agent” section of your password entry.
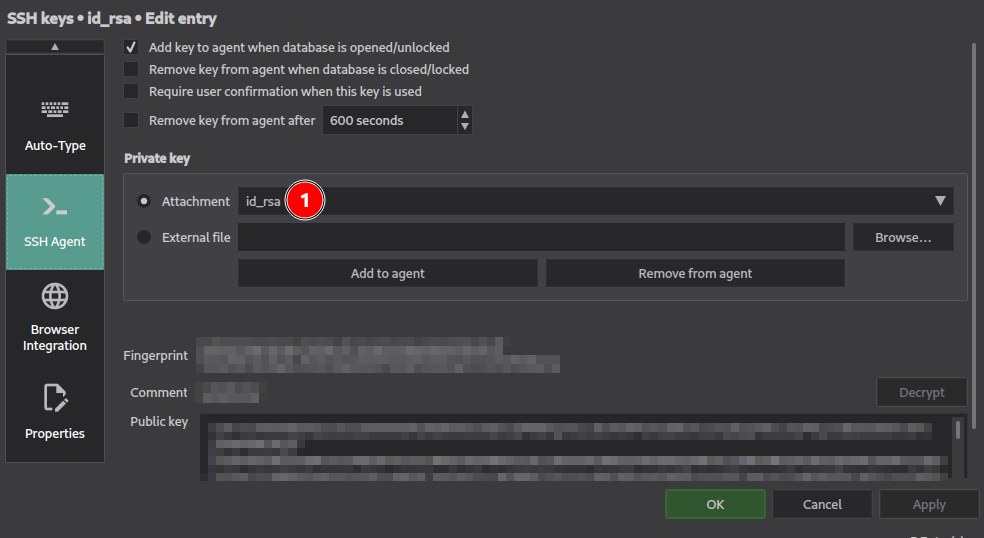
Select “Attachement” and select in the drop-list the key you’ve previously imported. KeepassXC will be able to read its content and the related public key. You’re ready to go !
No, if you execute the command ssh-add -l in a terminal, the new keys should be displayed.
Example on my laptop, before activating the SSH-Agent integration :
$ ssh-add -l

4096 SHA256:Rdxxxxxxxxxxxxxxxxxxxxxxxxxxxxxx seb@ux550vd (RSA)
After enabling the integration :

Let’s give it a try, I’ll test the SSH connection with GitHub for Git on SSH :
$ ssh git@github.com

The authenticity of host 'github.com (140.82.121.4)' can't be established.
ED25519 key fingerprint is SHA256:+DiY3xxxxxxxxxxxxxxxxxxxxx
This key is not known by any other names.
Are you sure you want to continue connecting (yes/no/[fingerprint])? yes
Warning: Permanently added 'github.com' (ED25519) to the list of known hosts.
PTY allocation request failed on channel 0
Hi Wivik! You've successfully authenticated, but GitHub does not provide shell access.
Connection to github.com closed.
This laptop never had this key, and now thanks to the SSH-Agent integration, it can use it !
Observations and recommendations
As you can see, KeepassXC is a sweet tool able to synchronize your vital credentials into a single encrypted database. The Browser and SSH-Agent integration are very useful, but you’ll need to remember that you have to enable it for each instance of KeepassXC you use.
If you have a Desktop and a Laptop, the Browser Integration and SSH-Agent options must be enabled for each of these KeepassXC installations if you need them.
We didn’t talked about the GPG keys in KeepassXC because there is no such integration available with it at my knowledge. You may still backup your private key in the database by using the file attachement to an entry in the same way as the SSH key, but you won’t be able to use it directly.
And in a more global thought, you can store in the database a file that would contain sensitives data you need to keep encrypted. You can use a dedicated database to this sole purpose. The content of the database is encrypted in any case. But for encrypted data containers, you should take a look at Veracrypt.
The database can be stored on a Cloud storage provider such as Infomaniak kDrive, DropBox, Nextcloud, Google Drive, etc as explained by the documentation. Of course you should restrict its access to your own usage unless you absolutely trust the people you would share it with. Don’t share it publicly !
Also, here are some good practices about backing-up your database regularly. You need to do it because it’s a single point of failure : you loose it, you loose everything and nobody can restore it for you. Maintaining save copies would reduce the risk of data loss in case of deletion or corruption of the file. It happened to me a long time ago, and I’ve cried. Fortunately, I could restart from a copy on another computer, but it was outdated and I’ve lost some entries I’ve have to recreate.
Here is a 3, 2, 1 back-up strategy I would recommend :
- Keep three copies of your database :
- KeepassXC automatically creates a
.bakversion after each modification, but another one is still good to have
- KeepassXC automatically creates a
- Two on different type of storage medium or places :
- The main one in your Cloud storage synchronized with your devices and a non-synchronized backup copy on another device for example
- Or a copy on an USB stick you keep with you
- One offline / offsite :
- On an USB stick dedicated to this usage,
- or using the unencrypted CSV export feature, print it and store it in a safelock (the file must not be accessible to unauthorized people !)
- and possibly stored in a remote place you would trust (family, etc)
And most important : your backup copies must be tested regularly !
But that may be a little overkill, that just depend of your paranoid level. If you keep copies on your Cloud storage and if that storage can manage files versions, you already have a good start. The minimum is to regularly copy the database into another file never used aside from some integrity testing.
Some other best practices is to regularly change your various passwords on the online services. Since you don’t have to remember them, it’s not a problem anymore. Also, you should change the encryption key on a regular routine. If you’re afraid to forgot the encryption key, you should write it on a paper and keep it in a safelock.