Manage your project documentation as Code

As an architect, the main product I deliver is a document named “Technical Architecture Document”. This document is basically a high level specification (not because it’s rocket science, it’s just a detailed global perspective) explaining how a software project will be implemented with the rest of the information system. And in most of the case, the template for this document is an Office suite-related document type such as a Microsoft Office document, or anything else.
But, maintaining these documents in time is always a pain. They can evolve according to the architecture framework. They can evolve according to a branding change for the company. Also, since its a fundamental document, it requires to have an editing history, a versioning, a validation workflow, etc. All of these features exist somehow in the various Office suites. But I can’t say if it’s the most efficient way in my opinion. That’s why there is a principle I love for documentation : Documentation as Code.
I’ve took the example of an Architecture Document, but this principle can applies (and is used) for other use-cases :
- Your code documentation, several languages already include documentation snippet that can be rendered in a documentation, taking out the pain of documenting then new features
- Your exploitations procedures : how to maintain the product, etc. They need versioning and validations, this idea applies too
What is Documentation as Code
Doc as Code is a principle expecting the project’s documentation to be treated at the same level as the software’s code. The documentation is maintained in the same way : using development tools such as IDE and Git to version it. A simple markup language like Markdown removes the pain of having to write it on whatever Office suite you have and warranties you to maintain the same template. Also, delivering the documentation at the same moment as the code can be a Definition of Done criteria for delivery acceptance. And the CICD Automation can delivers the documentation in the same way as the application.
Let’s summarize the benefits :
- Developer friendly, they don’t have to switch to another tool and writing some boring text in another document : they deliver it with their code.
- Standard : using a basic markup language such as Markdown warranties the documentation to remain the same
- And you don’t have to endure the conversions risks between the Office suites formats ! Even between their own versions
- Versioned : Using Git to maintain your documentation provides you the same benefits as you have on the code
- Automated : The document production is automated and updated at each delivery, no more “you forgot the documentation”, “the documentation is outdated”
- Can be tested : we won’t do it in this article, but some tools can check the documentation “readability” and also for broken links
Implementation example
I've never done Doc as Code using an ODT file before, the implementation example will be the result of a die-and-retry experimentation. During the construction, the repository content and document changed a little, this will be explained during the run.
For this example, I’ll use the Technical Architecture Document as an example. These kind of document provide several nice challenges for Doc as Code. Let’s say I’ll have to deliver it using OpenOffice Document format.
The Document structure
My Technical Architecture document uses the following layout :
- One front page displaying the Product Name as a title
- A header with the Company name and a blue background.
- A footer with the same background color, including the page number
- A page with the Table of Contents
- The following content :
- Project description section
- Functional architecture section
- Technical architecture section
- Security requirements section
- And page with the revision history
The most interesting part in the content is the various architecture diagram that will need to be rendered. There is a way to do it as code too, we will see that in the tools list just below.
Our tools grocery list
To manage this document as code, we will use the following tools :
- Any kind of IDE/Markdown editor
- OpenOffice to create the basic template
- PlantUML, a text to graph diagram tool
- Some Python code for the PlantUML filter
- Pandoc, a universal document converter I’ve used for my eBook.
Pandoc and PlantUML are usually available in Linux Distributions repositories.
Create the template document
First of all, the less enjoyable part for me, is to create the template document that Pandoc will use for the rendering. There are multiple ways to do it, but some of them are directory writing the HTML code and CSS used by the OpenDocument format. I didn’t want to go there, so I’ve used the other possible way : use an existing ODT document.
Honestly, I’m not an OpenOffice warrior so let’s keep things simple and stupid. I came up with the following template I’ve named reference.odt :
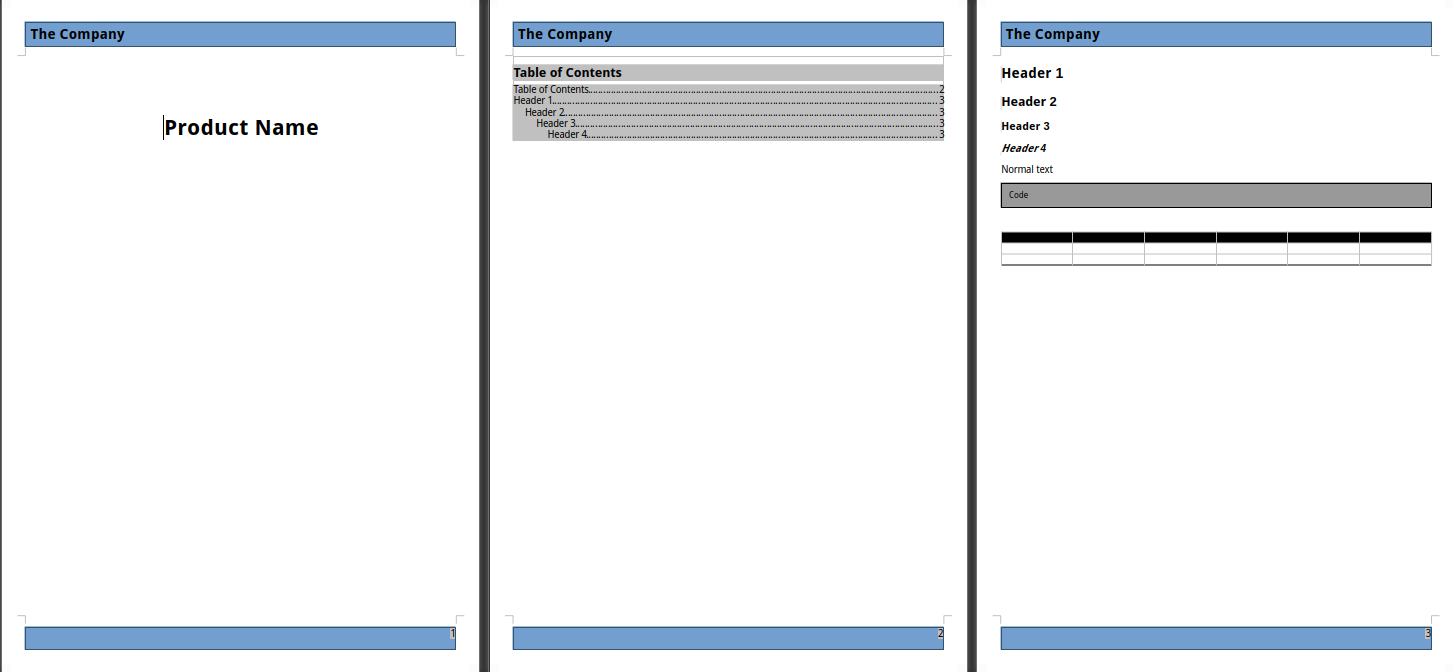
It’s not the most beautiful doc we’ve ever seen, but it’ll do the job. What’s important here is the layout : I’ve pre-filled various text styles to ensure my template matches my needs. Basically, Pandoc will use this template and replace the content with our markdown source.
BTW, I’ve tried with OnlyOffice and exported it in Microsoft Word format, the result was awful. I know Pandoc can treat MS Office formats, but in this case it was bad. Another thing I’ve didn’t tried because I don’t use it, it’s Google Docs format. I know you can export them in ODT, but that’s all I can say about it.
Initiate the Markdown source
Our Technical Architecture Document will be written using Markdown. For a better readability, it will be cut into several parts :
- The metadata “header” file
- The revision history
- The content
It will be a similar layout as the eBook I’ve wrote because I’ve liked this method.
The first file named 00-header.md contains a YAML metadata block.
---
title: The Application
---
This metadata will replace the title of the first page.
The second file named 01-revision.md is here to display the revision history. This file will be maintained using Git history and is basically empty. It just contains the section title.
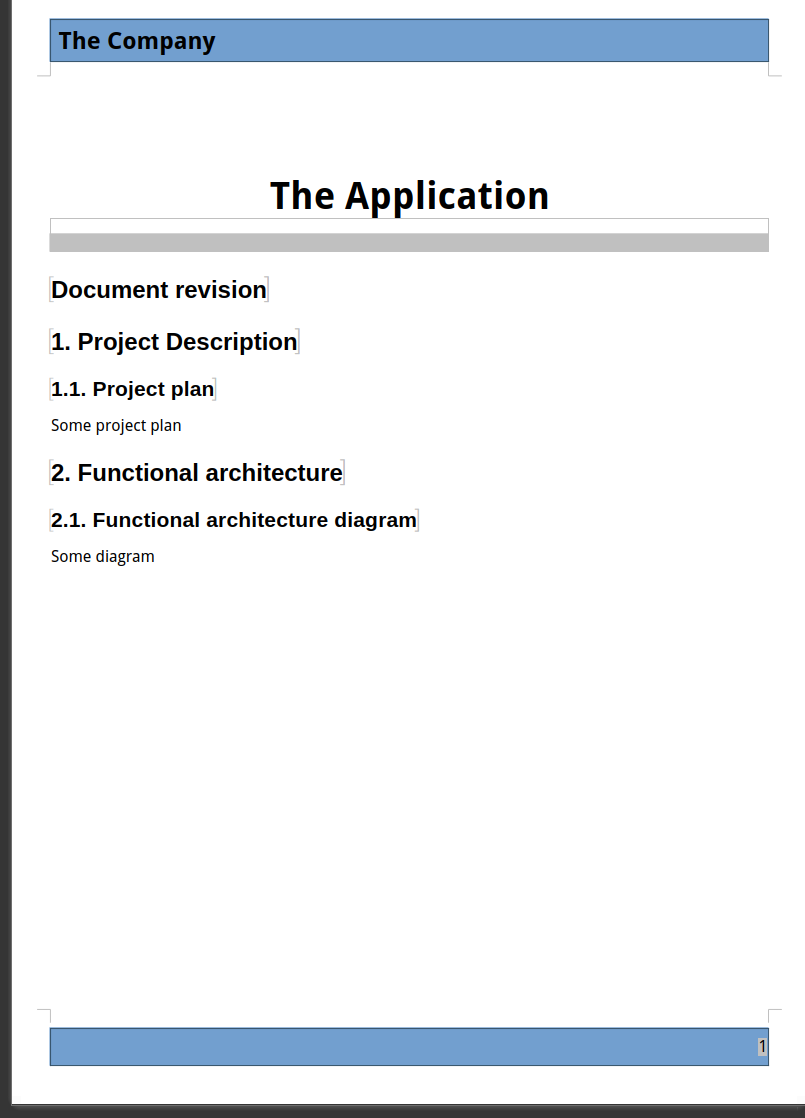
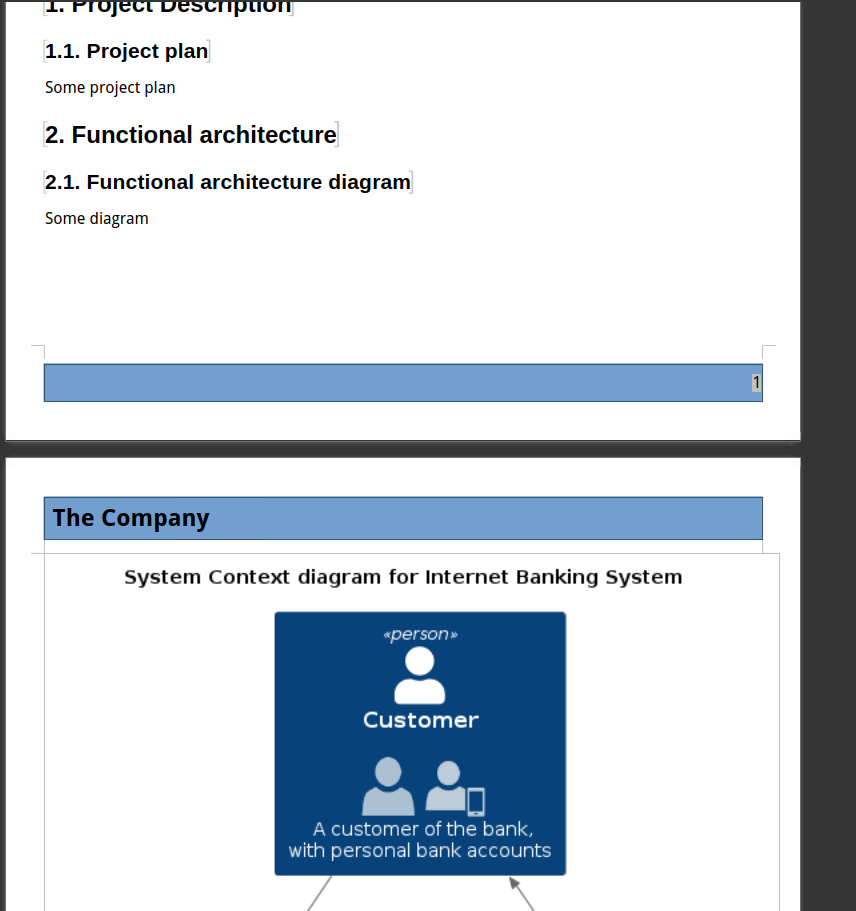
The last one name 02-content.md is the actual content of our document.
# 1. Project Description {#project-description}

## 1.1. Project plan {#project-plan}

Some project plan

# 2. Functional architecture {#functional-architecture}

## 2.1. Functional architecture diagram {#functional-architecture-diagram}

Some diagram

(etc)
First run
Now we have the basics, we can ask Pandoc to produce a first run of the document. We will use the following command line :
pandoc --reference-doc=reference.odt \
-o test.odt \
--toc \
--standalone $(ls 00-*.md 01-*.md 02-*.md)
Let’s explain :
--reference-docis the argument telling to use our reference template file-o test.odtwill be the produced output--toc: will generate the table of contents (TOC), our template has it as a placeholder--standalone: a required argument for Pandoc to generate the table of contents$(ls 00-*.md 01-*.md 02-*.md): we fetch in order our three markdown files
In the workspace, we should have a file named test.odt produced. Let’s open it :
We have almost everything : The title, the layout, the content. However, the TOC is empty, that’s because it’s a generated content and LibreOffice doesn’t calculate them by default. An option exists to automatically update these kind of fields at document opening.
If we update the index, the TOC is populated.
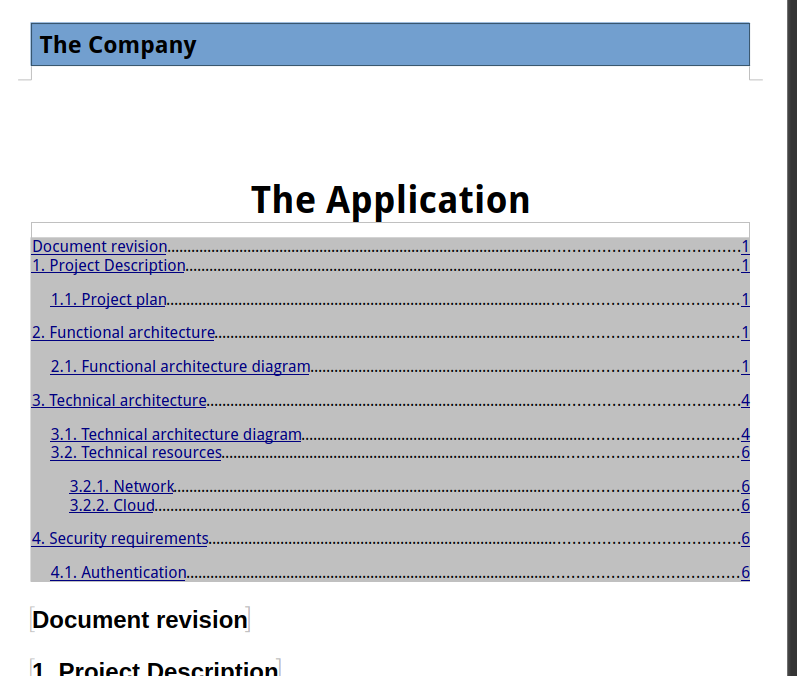
Please note this is specific to LibreOffice (and maybe other Office suite, I don’t know). Producing a PDF output will correctly populate the TOC in the result without asking anything else.
Now, a good technical architecture document contains some diagrams. How to do that ? With PlantUML and some Python code.
Generate the diagrams
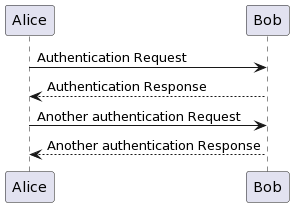
PlantUML Is a tool able to produce diagram with declarative text. Basically, writing this :
@startuml
Alice -> Bob: Authentication Request
Bob --> Alice: Authentication Response

Alice -> Bob: Another authentication Request
Alice <-- Bob: Another authentication Response
@enduml
In a .uml file and run the tool will produce :
Since we have two diagram to present in our document, I’ve took some examples from PlantUML’s website.
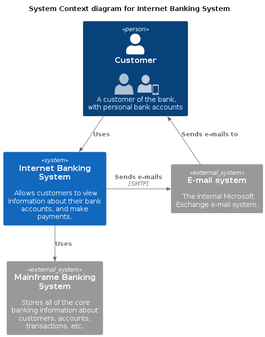
The functional architecture (an example of a C4 render for Internet banking system) will be this one :
```plantuml
!include <c4/C4_Context.puml>

'ref http://plantuml.com/stdlib
!include <office/Users/user.puml>
!include <office/Users/mobile_user.puml>

'LAYOUT_WITH_LEGEND

title System Context diagram for Internet Banking System

Person(customer  , Customer , "<$user> <$mobile_user>\n A customer of the bank, with personal bank accounts" )

System(banking_system, "Internet Banking System", "Allows customers to view information about their bank accounts, and make payments.")

System_Ext(mail_system, "E-mail system", "The internal Microsoft Exchange e-mail system.")
System_Ext(mainframe, "Mainframe Banking System", "Stores all of the core banking information about customers, accounts, transactions, etc.")

Rel(customer, banking_system, "Uses")
Rel_Back(customer, mail_system, "Sends e-mails to")
Rel_Neighbor(banking_system, mail_system, "Sends e-mails", "SMTP")
Rel(banking_system, mainframe, "Uses")
\```
Which renders :
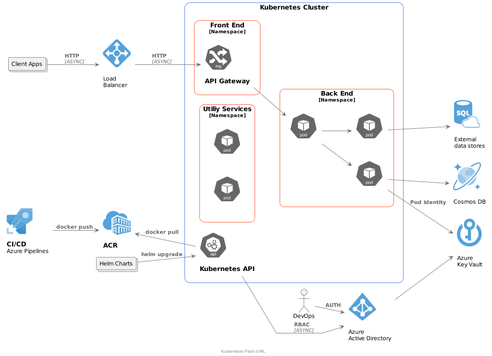
And the technical, using a template for Kubernetes host on Microsoft Azure.
```plantuml
footer Kubernetes Plant-UML
scale max 1024 width
skinparam linetype polyline
skinparam nodesep 10
skinparam ranksep 10


' Azure
!define AzurePuml https://raw.githubusercontent.com/RicardoNiepel/Azure-PlantUML/release/2-1/dist

!includeurl AzurePuml/AzureCommon.puml
!includeurl AzurePuml/AzureSimplified.puml

!includeurl AzurePuml/Compute/AzureAppService.puml
!includeurl AzurePuml/Compute/AzureBatch.puml
!includeurl AzurePuml/Containers/AzureContainerRegistry.puml
!includeurl AzurePuml/Containers/AzureKubernetesService.puml
!includeurl AzurePuml/Databases/AzureDatabaseForPostgreSQL.puml
!includeurl AzurePuml/Databases/AzureCosmosDb.puml
!includeurl AzurePuml/Databases/AzureSqlDatabase.puml
!includeurl AzurePuml/DevOps/AzurePipelines.puml
!includeurl AzurePuml/Identity/AzureActiveDirectory.puml
!includeurl AzurePuml/Networking/AzureLoadBalancer.puml
!includeurl AzurePuml/Security/AzureKeyVault.puml
!includeurl AzurePuml/Storage/AzureBlobStorage.puml
!includeurl AzurePuml/Storage/AzureStorage.puml

' Kubernetes
!define KubernetesPuml https://raw.githubusercontent.com/dcasati/kubernetes-PlantUML/master/dist

!includeurl KubernetesPuml/kubernetes_Context.puml
!includeurl KubernetesPuml/kubernetes_Simplified.puml

!includeurl KubernetesPuml/OSS/KubernetesApi.puml
!includeurl KubernetesPuml/OSS/KubernetesIng.puml
!includeurl KubernetesPuml/OSS/KubernetesPod.puml

actor "DevOps" as devopsAlias
collections "Client Apps" as clientalias
collections "Helm Charts" as helmalias

left to right direction

' Azure Components
AzureActiveDirectory(aad, "\nAzure\nActive Directory", "Global")
AzureContainerRegistry(acr, "ACR", "Canada Central")
AzureCosmosDb(cosmos, "\nCosmos DB", "Global")
AzureKeyVault(keyvault, "\nAzure\nKey Vault", "Global")
AzureLoadBalancer(alb, "\nLoad\nBalancer", "Canada Central")
AzureSqlDatabase(sql, "\nExternal\ndata stores", "Canada Central")
AzurePipelines(ado, "CI/CD\nAzure Pipelines", "Global")

' Kubernetes Components
Cluster_Boundary(cluster, "Kubernetes Cluster") {
    KubernetesApi(KubernetesApi, "Kubernetes API", "")

    Namespace_Boundary(nsFrontEnd, "Front End") {
        KubernetesIng(ingress, "API Gateway", "")
    }

    Namespace_Boundary(nsBackEnd, "Back End") {
        KubernetesPod(KubernetesBE1, "", "")
        KubernetesPod(KubernetesBE2, "", "")
        KubernetesPod(KubernetesBE3, "", "")
    }

    Namespace_Boundary(nsUtil, "Utiliy Services") {
        KubernetesPod(KubernetesUtil1, "", "")
        KubernetesPod(KubernetesUtil2, "","")
    }
}

Rel(devopsAlias, aad, "AUTH")
Rel(helmalias, KubernetesApi, "helm upgrade")

Rel(aad, keyvault, " ")
Rel(KubernetesApi, aad, "RBAC", "ASYNC")

Rel(clientalias, alb, "HTTP", "ASYNC")
Rel(alb, ingress, "HTTP", "ASYNC")

Rel(ingress, KubernetesBE1, " ")
Rel(KubernetesBE1, KubernetesBE2, " ")
Rel(KubernetesBE1, KubernetesBE3, " ")

Rel(KubernetesBE2, sql, " ")
Rel(KubernetesBE3, keyvault, "Pod Identity")
Rel(KubernetesBE3, cosmos, " ")

Rel(ado, acr, "docker push")
Rel_U(KubernetesApi, acr, "docker pull")
\```
Which renders :
We just need to integrate them in the Markdown content, like this :

You may have noticed a difference : PlantUML syntax starts with @startuml and ends with @enduml. We don't use them in the Markdown integration because the Python script below will do it.
But, to have a functional conversion, we need to make a filter for Pandoc. This example is made using Python (note : the version displayed here does not warranty to be the latest, checkout on the repository to be sure) :
#!/usr/bin/env python3
import os
import sys
from pandocfilters import toJSONFilter, Para, Image
from subprocess import call
from hashlib import sha1

def plantuml(key, value, format, _):
    if key == 'CodeBlock':
        [[ident, classes, keyvals], code] = value
        if "plantuml" in classes:
            base_filename = sha1(code.encode(sys.getfilesystemencoding())).hexdigest()
            plantuml_filename = base_filename + ".puml"
            png_filename = base_filename + ".png"
            if not os.path.isfile(png_filename):
                with open(plantuml_filename, "w") as f:  # create a .uml file
                    f.write("@startuml\n")
                    f.write(code)
                    f.write("\n@enduml")
                call(["plantuml", plantuml_filename])  # convert the .uml file into a .png file
            return Para([Image([ident, [], keyvals], [], [png_filename, ""])])

if __name__ == "__main__":
    toJSONFilter(plantuml)
Since we’ve tagged the Markdown Code block with plantuml, the filter will process its content and add the @startuml and @enduml steps in a temporary file. Then, this file will be converted by PlantUML using the tool’s binary. Pandoc will be replace the code with the PNG output.
The .gitignore file ensure to not commit the generated outputs.
# .gitignore
*.puml
*.png
*.odt
Save this script as plantuml.py for example. You may have to install requirements such as pandocfilters, a virtualenv would be advised.
Let’s give it a try, we add a supplementary argument :
pandoc --reference-doc=reference.odt \
-o test.odt \
--toc \
--standalone \
--filter=./plantuml.py $(ls 00-*.md 01-*.md 02-*.md)
And the result :
The diagram is included in our document ! The second one overflows the page, but that’s a good start.
Let’s automate this
I’ve created a new Git repository with the following content :
.
├── container
│   ├── Dockerfile
├── content
│   ├── 00-header.md
│   ├── 01-revision.md
│   └── 02-doc.md
├── filter
│   ├── plantuml.py
│   └── requirements.txt
├── .github
│   └── workflows
│       ├── .gitignore
│       └── publish.yaml
├── README.md
└── template
    └── reference.odt
containeris the sources of a customized Containerfile for Pandoc, because of missing PlantUML.contentwill be the directory that contains all of the document’s contentfilteris the directory that contains the PlantUML filter for Pandoctemplatewill contain the reference document
Since it’s just and implementation trial, I’ve put everything in the same repository. A better set-up would be to use a Git submodule to fetch the template and the filter to ensure it’s always up to date. We will see that in the latest part.
As the example is hosted on GitHub, we will use a GitHub Actions workflow.
Container part
Since PlantUML was missing in Pandoc’s image, I’ve have to rebuild the container image to integrate it. The Dockerfile was pretty simple.
FROM pandoc/extra:latest-ubuntu

RUN apt-get update && apt-get install   default-jre   graphviz   plantuml   -y && apt-get clean   autoclean && apt-get autoremove   --yes && rm -rf   /var/lib/{apt,dpkg,cache,log}/
I’ve made a simple build and publish workflow in order to have it in the GitHub registry.
Pandoc generation
Now, a Publish workflow has been made to test our setup.
Once again, it’s a pretty simple workflow that will use the previously built Container image to execute Pandoc’s magic.
name: Publish the document

on:
  workflow_dispatch:

jobs:
  publish:
    runs-on: ubuntu-latest
    steps:

      - name: Checkout content
        uses: actions/checkout@v3

      - name: Fetch files in workspace
        id: content-files
        run: echo CONTENT_FILES=$(ls content/00-*.md content/01-*.md content/02-*.md) >> $GITHUB_OUTPUT

      - name: Write epub
        uses: docker://ghcr.io/wivik/doc-as-code-example:latest
        with:
          args: "-o technical-architecture-document.odt --reference-doc=template/reference.odt --resource-path=.:content ${{ steps.content-files.outputs.CONTENT_FILES }} --standalone --toc --filter=filter/plantuml.py"

      - name: Upload odt file
        uses: actions/upload-artifact@v3
        with:
          name: odt-file
          path: technical-architecture-document.odt
          retention-days: 1
At the end, I’ve upload the artifact in the temporary shared storage of GitHub, that’s just for the test.
After the execution, the ODT file is produced with the same result as on my computer.
Add the Changelog to the document
As a Changelog can be quickly long, I’ve modified the order of the markdown files to put it to the end of the document, as a supplementary part. I’ve also created a header and a content file.
content
├── 00-header.md
├── 01-doc.md
├── 02-01-revision-header.md
└── 02-02-revision-content.md
The idea is : the changelog will be generated into the content file and concatenated by Pandoc with the header.
Since I didn’t want to fight with marketplace GitHub Actions that would not do what I want, I’ve used a good old bash script with Git commands to produce my changelog between the HEAD and the previous tag. This shell task has been added to the workflow :
      - name: Write changelog
        run: |
          echo "## ${{ steps.revision.outputs.tag }}" > revision.md
          echo "" >> revision.md
          git log $(git describe --tags --abbrev=0)..HEAD \
          --pretty=format:"- %h %an %aD %s" >> revision.md
          echo "" >> revision.md
          echo "" >> revision.md
          echo "" >> revision.md
          cat ./content/02-02-revision-content.md >> revision.md
          echo "" >> revision.md
          echo "" >> revision.md
          cat revision.md > ./content/02-02-revision-content.md
          rm revision.md
Yes, I’ve put a lot of line break because I’ve had issues with Markdown.
Once executed, a release is published on GitHub with my ODT file.
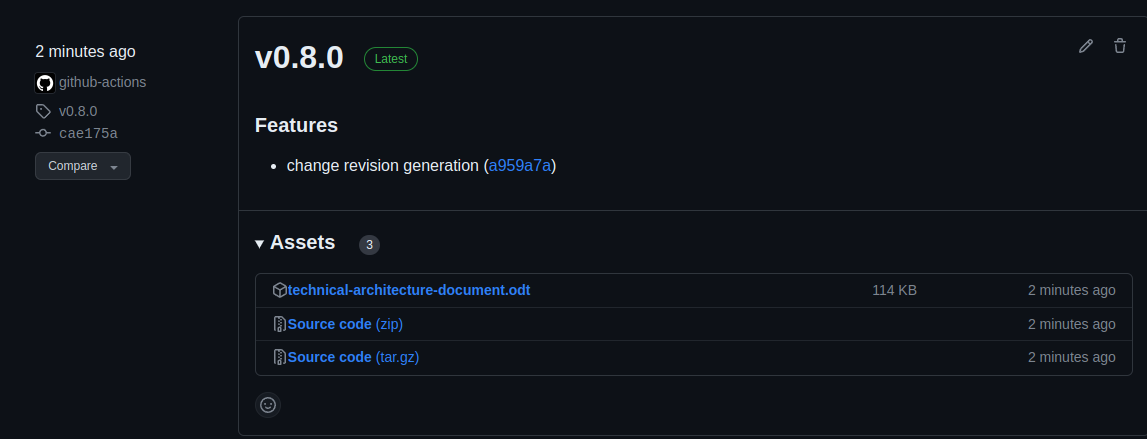
And the changelog is correctly displayed at the end of the document.

Make this better, split repositories
Now we have the basis, we can do something more realistic and put the template and the Pandoc container image to a dedicated repository. Then, the document’s repository will just have to pull them and execute them. With this set-up, we can ensure the document maintain a continuity if the graphic chart evolves.
So, I’ve moved every template related files to a repository named “template” (original, isn’t it ?).
.
├── CHANGELOG.md
├── container
│   ├── Dockerfile
│   └── version_file.json
├── filter
│   ├── plantuml.py
│   └── requirements.txt
├── LICENSE
├── README.md
├── template
│   └── reference.odt
└── version_file.json
On the document side, I’ve added this part in the workflow :
      - name: Checkout reference
        uses: actions/checkout@v3
        with:
          repository: Wivik/doc-as-code-template
          path: template
I’m cloning the template repository, so I can fetch the template and the filter for Pandoc. This could also be achieved by using a Git Submodule.
And here is the whole publish workflow :
name: Publish the document

on:
  workflow_dispatch:

permissions:
  contents: write

jobs:
  publish:
    runs-on: ubuntu-latest
    steps:

      - name: Checkout content
        uses: actions/checkout@v3

      - name: Checkout reference
        uses: actions/checkout@v3
        with:
          repository: Wivik/doc-as-code-template
          path: template

      - name: Produce changelog
        uses: TriPSs/conventional-changelog-action@v3.19.0
        id: revision
        with:
          version-file: './version_file.json'
          output-file: false
          skip-commit: true
          skip-tag: true

      - name: Write changelog
        run: |
          echo "## ${{ steps.revision.outputs.tag }}" > revision.md
          echo "" >> revision.md
          git log $(git describe --tags --abbrev=0)..HEAD \
          --pretty=format:"- %h %an %aD %s" >> revision.md
          echo "" >> revision.md
          echo "" >> revision.md
          echo "" >> revision.md
          cat ./content/02-02-revision-content.md >> revision.md
          echo "" >> revision.md
          echo "" >> revision.md
          cat revision.md > ./content/02-02-revision-content.md
          rm revision.md

      - name: Fetch files in workspace
        id: content-files
        run: echo CONTENT_FILES=$(ls content/00-*.md content/01-*.md content/02-*.md) >> $GITHUB_OUTPUT

      - name: Write epub
        uses: docker://ghcr.io/wivik/doc-as-code-template:latest
        with:
          args: "-o technical-architecture-document.odt --reference-doc=template/template/reference.odt --resource-path=.:content ${{ steps.content-files.outputs.CONTENT_FILES }} --standalone --toc --filter=template/filter/plantuml.py"

      - name: Tag release
        uses: TriPSs/conventional-changelog-action@v3.19.0
        id: changelog
        with:
          github-token: ${{ secrets.github_token }}
          skip-version-file: true

      - name: Publish release
        uses: softprops/action-gh-release@v1
        if: ${{ steps.changelog.outputs.tag }}
        with:
          body: ${{ steps.changelog.outputs.clean_changelog }}
          tag_name: ${{ steps.changelog.outputs.tag }}
          files: |
            technical-architecture-document.odt
And here we are ! Now we have the basis, this document can be managed like any any software project, by using an integration workflow : Branch, Pull Request, Integration, Release, et voilà !
Observed limitations
I don’t really know if it’s because I suck with LibreOffice or if it’s some tools limitations that required deeper investigation, but there are some flaws in the results.
First, my front page layout and the page breaks are lost. I don’t know why and it’s too bad since it breaks the expected layout.
The diagram are too big and overflowing, maybe some styling is possible for the images. I must admit I didn’t searched for more.
The TOC requiring to be populated is annoying.
The Table layout is not preserved.
However, I’ve noted some issues are not present while using a PDF export. But on this other hand, Pandoc does not preserve the styling in PDF, only the document structure.
Conclusion
Despite the limitation, I think this method is a good thing to maintain documentation using the CICD practices. Documentation management is always a pain and the Office suite are complicated for this in my opinion. I hope this POC will give you some idea. The two repositories are opened, steal them, that’s their purpose.